This little project came from two things:
The fact that you can start with a solved cube and repeatedly apply a pattern of moves until the cube is returned to its solved state.
The fact that I kept messing up my son’s higher order cubes because I lost my place in the pattern and irritating him when I asked him to solve them.
So, I made a spreadsheet to model several different types of cubes. This lets me try out patterns and see what they would do without messing up a real cube.
First, A Proof
Here’s a simple proof that starting with a solved cube and repeating any pattern will eventually solve the cube:
Select a pattern of moves to repeat. Call a solved cube “Arrangement 0”.
Applying the pattern to Arrangement 0 produces Arrangement 1. Applying the pattern to Arrangement 1 produces Arrangement 2, and so on.
Since the pattern is deterministic, applying the pattern to Arrangement N will always produce Arrangement N+1.
The pattern is also reversible. Applying the reverse of the pattern to Arrangement N+1 will always produce Arrangement N.
Putting statements 3 and 4 together, each arrangement has exactly 1 next arrangement and exactly 1 previous arrangement.
There are a finite number of arrangements of a Rubik’s cube, so this process must eventually return (or “loop back”), to a previously produced arrangement.
The series of arrangements must loop back to Arrangement 0. If applying the pattern to Arrangement N produced Arrangement 1, then it would mean that both Arrangement 0 and Arrangement N produce Arrangement 1, which contradicts statement 5, above.
Thus, starting with a solved cube and repeating a pattern of moves will always return the cube to its solved state. It’s just a matter of how many repetitions it takes…
How Many Repetitions Will It Take?
To calculate how many times a pattern must be repeated to restore the cube to a solved state, we just have to look at the effects of a single repetition.
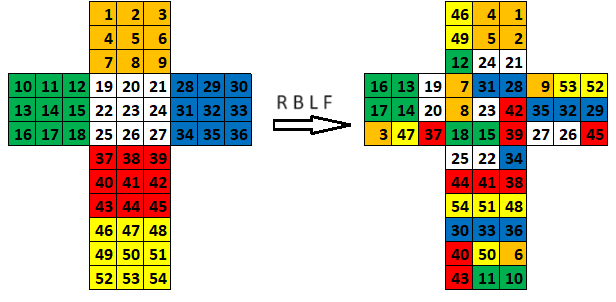
Let’s take the pattern R B L F. We will assign a number to every surface on a Rubik’s cube and track the effect of applying the pattern:

In a solved cube, the surface’s number matches the position. That is, the Surface 1 is in Position 1, Surface 2 is in Position 2, etc.
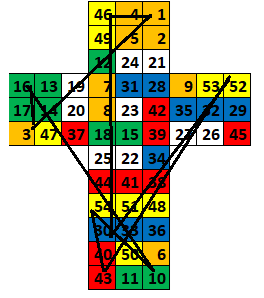
After applying the pattern once, Surface 1 is in Position 3. Surface 3 is in Position 16, which means that if we apply the pattern a second time, we can expect Surface 1 to move to Position 16. Continuing the loop gives us this:

Surface 1 moves through Positions 3, 16, 10, 54, 43, 52, 30, and 46 before returning back to Position 1. Thus, it takes 9 repetitions of the R B L F pattern to return Surface 1 back to Position 1.
Surface 2 goes through a cycle of 7 positions: 6, 51, 44, 40, 49, 4, 2.
Surface 7 goes through a cycle of 3 positions: 19, 12, 7.
Surface 8 goes through a cycle of 5 positions: 22, 38, 42, 24, 8.
Tracing through all other Surfaces shows that they all go through cycles of 3, 5, 7, or 9 Positions. Since all pieces must be in their original positions for the cube to be solved, the number of repetitions must be divisible by all the cycle lengths. That is, it must be the Least Common Multiple of 3, 5, 7, and 9, which is 315.
Thus, the R B L F pattern must be repeated 315 times to return the cube to the solved position.
This is the work that the spreadsheet does for me.
The Spreadsheet
The spreadsheet is available here: https://github.com/telemath/RubiksCubeSpreadsheet.
It has two main functions:
Given a pattern of moves, it will tell me how many times the pattern must be applied to a solved cube to return it back to the solved state. For instance, given the R B L F pattern, it will calculate that the four-move pattern must be repeated 315 times, for a total of 1,260 moves.
Given a move number, it will show what the cube will look like after that move. Knowing the cycle that each surface goes through, it can project the positions of all the surfaces after any number of moves.
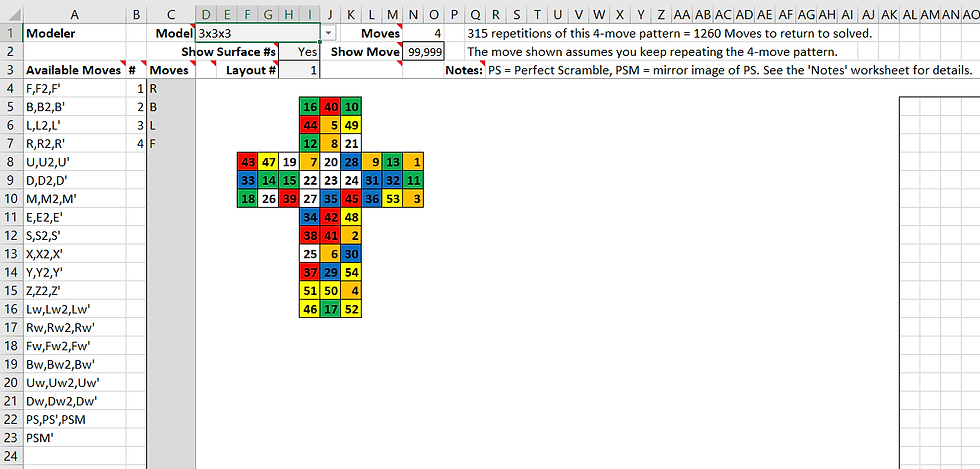
For example, given the R B L F pattern and 99,999 moves, it will calculate that it needs to repeat the four-move pattern 24,999 times, with three extra moves at the end (R B L). Since Surface 1 returns to its original position every nine repetitions of the pattern, we only need to look at the last 24,999 mod 9 = 6 repetitions of the pattern. On the sixth iteration of the pattern, Surface 1 is in Position 52. So Surface 1 is in Position 52 after 99,996 moves. It does this calculation for every surface.
Finally, it applies the remaining 3 moves to get the arrangement of the cube at move 99,999.
Using the Spreadsheet
I won’t go into all the spreadsheet’s formulas – I’ll just show how it’s used. The main worksheet, “Cube Modeler”, looks like this:

Model Selection (D1): This is a drop-down selection of the specific Rubik’s Cube model to show. It currently supports 2x2x2, 3x3x3, 4x4x4, 5x5x5, 1x2x3, 1x3x3, 2x2x3, 3x3x4, Skewb, Redi Cube, Gear Cube, Cross Cube 2, X-Cube 2, 2x2x4.
Supporting higher order Rubik’s cubes requires so many more rows and columns of formulas that the spreadsheet becomes very cumbersome. In the Git repository, there is a Rubik’s
Cube Heavy spreadsheet which supports 6x6x6 through 10x10x10 cubes. It’s there if you want it, but it’s painfully slow.
Notes (Q3): This shows any custom notes I added for the current cube model.
Available Moves (A4): Moves that you can enter in are listed in A3 through A53.
Moves (C4): Enter in the moves to model in C4 through C54, one move per cell.
Pattern Analysis (N1): N1 shows the length of the pattern, e.g. 4 moves for the R B L F pattern. Q1 shows the number of repetitions to solve the cube.
Show Move # (N2): Enter in the move # to show. Move 0 is always a solved cube.
Show Surface #'s (H2): A Yes/No selection to show or hide the number of each surface of the cube. Selecting “No” shows an uncluttered cube. Selecting “Yes” lets you better see how the pieces move around.
Use Aliases (N3): Higher order cubes, 4x4x4 and higher, have some pieces which look identical and can be swapped. Using Aliases will show them as the same surface number, so that the cube appears solved. Not using Aliases will show them as unique surface numbers.
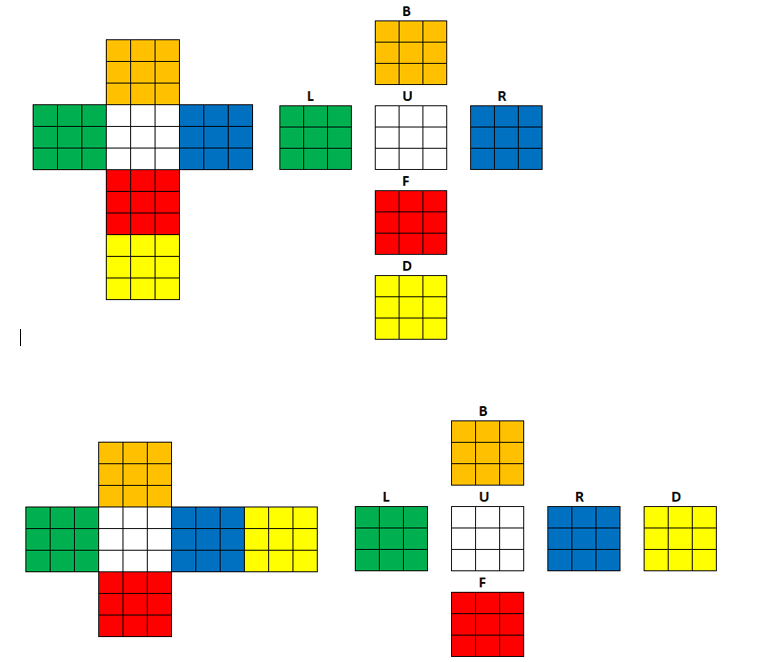
Layout # (H3): Lets you select which layout to draw. The spreadsheet supports any number of layouts, provided they are defined in the Data worksheet. The 3x3x3 cube supports these layouts:

Cell Comments
There are comments in many of the cells that explain what the cell means and how its value is calculated. If you really want to delve into how the spreadsheet does what it does, read these comments.
Notes
The Notes worksheet has a brief explanation of the worksheet, revision history, and some random bits of trivia.
That’s It!
That’s pretty much everything this worksheet does. I hope you find it interesting and I welcome any feedback you may have.
Comentarios